Tinting a picture and drawing part of it
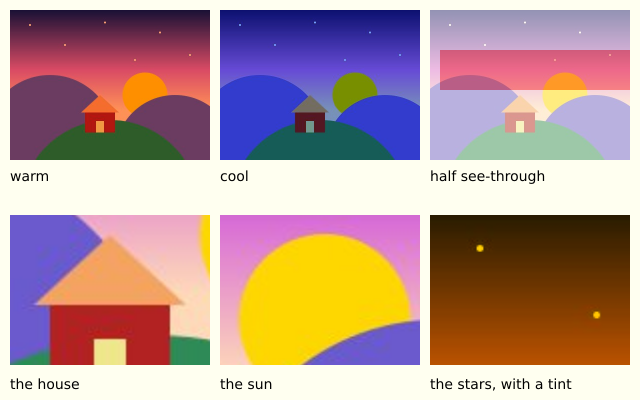
The same photo is drawn three times with a tint, and then three small parts of it are drawn bigger. A tint colours every picture drawn after it.
How it works
- f.tint() multiplies each pixel's red, green and blue by the tint, and its alpha too. f.tint(255, 170, 120) keeps all the red and takes some green and blue away, which looks warm.
- f.tint(255, 120) is white at about half strength, so the picture is half see-through.
- f.no_tint() stops the tint. Without it, every later picture would be tinted too.
- f.image(photo, x, y, w, h, sx, sy, sw, sh) draws only part. The last four numbers are the left, top, width and height of the part, in the photo's own pixels.
- The part is drawn into the box x, y, w, h, so a small part fills a bigger box.
Make it yours
- Change the three numbers in a tint. Try f.tint(100, 255, 100) for green.
- Use a colour name, as the last picture does: f.tint("gold") or f.tint("skyblue").
- Change the numbers in a part, such as 130, 160, 100, 75, to pick out a different bit.
- Make a part smaller, such as 50 by 38, to zoom in more.
- Draw a part into a tall, thin box and see how it stretches.
The code
Copy it into a file and run it.
"""Tinting a picture and drawing part of it

The same photo is drawn three times with a tint, and then three small parts of it are drawn
bigger. A tint colours every picture drawn after it.

How it works:
- f.tint() multiplies each pixel's red, green and blue by the tint, and its alpha too.
  f.tint(255, 170, 120) keeps all the red and takes some green and blue away, which looks warm.
- f.tint(255, 120) is white at about half strength, so the picture is half see-through.
- f.no_tint() stops the tint. Without it, every later picture would be tinted too.
- f.image(photo, x, y, w, h, sx, sy, sw, sh) draws only part. The last four numbers are the left,
  top, width and height of the part, in the photo's own pixels.
- The part is drawn into the box x, y, w, h, so a small part fills a bigger box.

Make it yours:
- Change the three numbers in a tint. Try f.tint(100, 255, 100) for green.
- Use a colour name, as the last picture does: f.tint("gold") or f.tint("skyblue").
- Change the numbers in a part, such as 130, 160, 100, 75, to pick out a different bit.
- Make a part smaller, such as 50 by 38, to zoom in more.
- Draw a part into a tall, thin box and see how it stretches.
"""
import funground as f

photo = f.load_image("data/photo.jpg")       # found next to this file


def setup():
    f.size(640, 400)


def label(words, x, y):
    f.fill("black")
    f.text_size(14)
    f.text(words, x, y)


def draw():
    f.background("ivory")

    # A stripe behind the third picture, to see through it.
    f.no_stroke()
    f.fill("tomato")
    f.rect(440, 50, 190, 40)

    # Row 1: the same photo with three tints.
    f.tint(255, 170, 120)                    # warm: less blue and green
    f.image(photo, 10, 10, 200, 150)
    f.tint(120, 170, 255)                    # cool: less red and green
    f.image(photo, 220, 10, 200, 150)
    f.tint(255, 120)                         # white, half see-through
    f.image(photo, 430, 10, 200, 150)
    f.no_tint()
    label("warm", 10, 168)
    label("cool", 220, 168)
    label("half see-through", 430, 168)

    # Row 2: three parts of the photo, each drawn bigger than it is.
    # image(picture, x, y, width, height, sx, sy, sw, sh)
    f.image(photo, 10, 215, 200, 150, 130, 160, 100, 75)    # the house
    f.image(photo, 220, 215, 200, 150, 215, 115, 105, 79)   # the sun
    f.tint("gold")
    f.image(photo, 430, 215, 200, 150, 10, 10, 120, 90)     # the stars, tinted too
    f.no_tint()
    label("the house", 10, 376)
    label("the sun", 220, 376)
    label("the stars, with a tint", 430, 376)


f.run()