Reading and writing single pixels
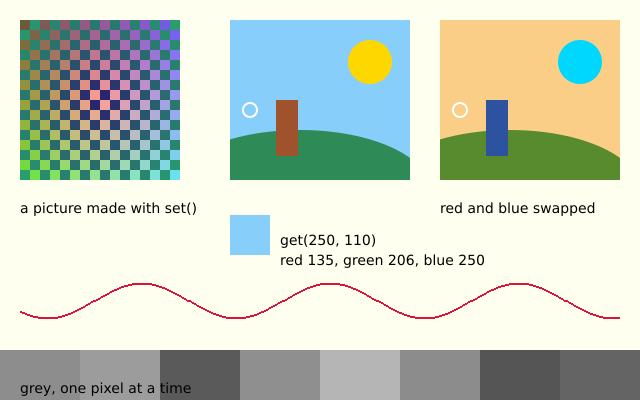
Five small tricks work on single pixels. A tile is built with f.set() and read with f.get(), colours are swapped over, and a band of the canvas turns grey.
How it works
- f.set(x, y, colour) makes one pixel a colour. f.get(x, y) reads one back as a colour, with .red, .green and .blue.
- f.get(x, y, w, h) with a size gives a picture, which is a copy of that part of the canvas.
- f.load_pixels() copies the canvas into the list f.pixels. It holds four numbers for each pixel (red, green, blue, alpha), row by row.
- The loops change the numbers in the list. f.update_pixels() writes them back to the canvas. A picture made with f.create_graphics() has its own load_pixels() and update_pixels(), used on the scene copy.
- f.create_graphics(w, h) makes an empty picture to draw on. The tile and the scene use it.
- A Python loop over every pixel is slow, so the example keeps the areas small.
Make it yours
- Change the 14 and 12 in make_tile() to change its colours.
- Change what the swap does: in the loop, set pixels[i + 1] = 0 to remove the green.
- Change the grey band: the range(350, 400) says which rows. Try range(0, 400) to grey everything.
- Change the wave: use 18 * math.sin(x / 30) with other numbers for a bigger or tighter wave.
- Change probe_x and probe_y to read the colour from another place.
The code
Copy it into a file and run it.
"""Reading and writing single pixels

Five small tricks work on single pixels. A tile is built with f.set() and read with f.get(),
colours are swapped over, and a band of the canvas turns grey.

How it works:
- f.set(x, y, colour) makes one pixel a colour. f.get(x, y) reads one back as a colour, with
  .red, .green and .blue.
- f.get(x, y, w, h) with a size gives a picture, which is a copy of that part of the canvas.
- f.load_pixels() copies the canvas into the list f.pixels. It holds four numbers for each pixel
  (red, green, blue, alpha), row by row.
- The loops change the numbers in the list. f.update_pixels() writes them back to the canvas.
  A picture made with f.create_graphics() has its own load_pixels() and update_pixels(), used on
  the scene copy.
- f.create_graphics(w, h) makes an empty picture to draw on. The tile and the scene use it.
- A Python loop over every pixel is slow, so the example keeps the areas small.

Make it yours:
- Change the 14 and 12 in make_tile() to change its colours.
- Change what the swap does: in the loop, set pixels[i + 1] = 0 to remove the green.
- Change the grey band: the range(350, 400) says which rows. Try range(0, 400) to grey everything.
- Change the wave: use 18 * math.sin(x / 30) with other numbers for a bigger or tighter wave.
- Change probe_x and probe_y to read the colour from another place.
"""
import math

import funground as f


def setup():
    f.size(640, 400)
    f.no_loop()


def make_tile():
    """A picture 16 by 16, made one pixel at a time."""
    tile = f.create_graphics(16, 16)
    for y in range(16):
        for x in range(16):
            distance = math.hypot(x - 7.5, y - 7.5)
            if (x + y) % 2 == 0:
                tile.set(x, y, (255 - int(distance * 14), 90 + y * 9, 60 + x * 12))
            else:
                tile.set(x, y, (40, 30 + int(distance * 12), 110))
    return tile


def label(words, x, y):
    f.fill("black")
    f.text_size(14)
    f.text(words, x, y)


def draw():
    f.background("ivory")

    # 1. The tile, drawn much bigger than it is. Each of its 256 pixels was set by hand.
    # no_smooth() keeps the big pixels sharp instead of blurring them.
    f.no_smooth()
    f.image(make_tile(), 20, 20, 160, 160)
    f.smooth()
    label("a picture made with set()", 20, 200)

    # 2. A little scene, drawn on a picture so it stays in its box, and an eyedropper:
    # get() reads the colour at one point.
    sky = f.create_graphics(180, 160)
    sky.no_stroke()
    sky.background("lightskyblue")
    sky.fill("gold")
    sky.circle(140, 42, 44)
    sky.fill("seagreen")
    sky.ellipse(70, 170, 260, 120)
    sky.fill("sienna")
    sky.rect(46, 80, 22, 56)
    f.image(sky, 230, 20)
    probe_x, probe_y = 250, 110
    picked = f.get(probe_x, probe_y)         # a colour object
    f.no_fill()
    f.stroke("white")
    f.stroke_width(2)
    f.circle(probe_x, probe_y, 14)
    f.no_stroke()
    f.fill(picked)                           # a colour object works wherever a colour does
    f.rect(230, 215, 40, 40)
    label("get(250, 110)", 280, 232)
    label(f"red {picked.red}, green {picked.green}, blue {picked.blue}", 280, 252)

    # 3. A copy of the scene as a new picture, with red and blue swapped in a loop.
    scene = f.get(230, 20, 180, 160)         # get() with a size gives a picture
    scene.load_pixels()
    pixels = scene.pixels                    # red, green, blue, alpha, red, green, blue, alpha, ...
    for i in range(0, len(pixels), 4):
        pixels[i], pixels[i + 2] = pixels[i + 2], pixels[i]
    scene.update_pixels()
    f.image(scene, 440, 20)
    label("red and blue swapped", 440, 200)

    # 4. One-pixel dots set straight on the canvas, along a wave.
    for x in range(20, 620):
        y = 300 + int(18 * math.sin(x / 30))
        f.set(x, y, "crimson")
        f.set(x, y + 1, "crimson")

    # 5. The whole canvas: the band along the bottom becomes grey. First, put some colour there.
    # load_pixels() sees everything drawn so far, this frame included.
    f.no_stroke()
    for i, name in enumerate(["tomato", "gold", "seagreen", "dodgerblue", "orchid", "orange", "teal", "crimson"]):
        f.fill(name)
        f.rect(i * 80, 350, 80, 50)
    f.load_pixels()
    data = f.pixels
    width = 640
    for y in range(350, 400):
        for x in range(width):
            i = (y * width + x) * 4
            grey = (data[i] + data[i + 1] + data[i + 2]) // 3
            data[i] = data[i + 1] = data[i + 2] = grey
    f.update_pixels()
    f.fill("black")
    f.text_size(14)
    f.text("grey, one pixel at a time", 20, 380)


f.run()