Aligning text
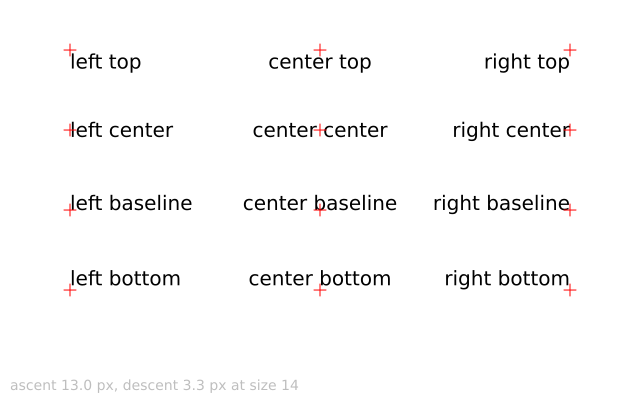
f.text_align() says which point of the text the (x, y) you give is. Each red cross is the (x, y) passed to f.text(), so you can see where the words land. f.text_ascent() and f.text_descent() measure how far letters reach above and below the baseline.
How it works
- f.text_align(horizontal, vertical) takes two words. The first is "left", "center" or "right". The second is "top", "center", "baseline" or "bottom".
- The point (x, y) stays put and the text moves around it. That is why every red cross is a fixed anchor.
- The baseline is the line the letters sit on. Letters like g and y hang below it.
- The two loops step through every pair of words, so you see all twelve ways in one picture.
- f.text_ascent() and f.text_descent() give the height above and below the baseline for the current size. The line at the bottom prints both numbers.
Make it yours
- Change the words in the two lists: use "center" in both, or leave one out.
- Change f.text_size(20) to something bigger and see how each alignment copes.
- Move the grid: change 70 and 250 in the x line, or 50 and 80 in the y line.
- Write a label against the right edge: f.text_align("right", "top") and then f.text("end", f.width, 0).
- Change the size on the last line, f.text_size(14), and watch the ascent and descent numbers grow.
The code
Copy it into a file and run it.
"""Aligning text

f.text_align() says which point of the text the (x, y) you give is. Each red cross is the (x, y)
passed to f.text(), so you can see where the words land. f.text_ascent() and f.text_descent()
measure how far letters reach above and below the baseline.

How it works:
- f.text_align(horizontal, vertical) takes two words. The first is "left", "center" or "right". The
  second is "top", "center", "baseline" or "bottom".
- The point (x, y) stays put and the text moves around it. That is why every red cross is a fixed
  anchor.
- The baseline is the line the letters sit on. Letters like g and y hang below it.
- The two loops step through every pair of words, so you see all twelve ways in one picture.
- f.text_ascent() and f.text_descent() give the height above and below the baseline for the current
  size. The line at the bottom prints both numbers.

Make it yours:
- Change the words in the two lists: use "center" in both, or leave one out.
- Change f.text_size(20) to something bigger and see how each alignment copes.
- Move the grid: change 70 and 250 in the x line, or 50 and 80 in the y line.
- Write a label against the right edge: f.text_align("right", "top") and then f.text("end", f.width, 0).
- Change the size on the last line, f.text_size(14), and watch the ascent and descent numbers grow.
"""
import funground as f


def cross(x, y):
    f.stroke("red")
    f.stroke_width(1)
    f.line(x - 6, y, x + 6, y)
    f.line(x, y - 6, x, y + 6)


def setup():
    f.size(640, 400)


def draw():
    f.background("white")
    f.fill("black")
    f.no_stroke()
    f.text_size(20)
    for row, vertical in enumerate(["top", "center", "baseline", "bottom"]):
        y = 50 + row * 80
        for column, horizontal in enumerate(["left", "center", "right"]):
            x = 70 + column * 250
            f.text_align(horizontal, vertical)
            f.fill("black")
            f.text(f"{horizontal} {vertical}", x, y)
            cross(x, y)
            f.no_stroke()

    # the measurements behind the alignment
    f.text_align("left", "baseline")
    f.text_size(14)
    f.fill("gray")
    f.text(f"ascent {f.text_ascent():.1f} px, descent {f.text_descent():.1f} px at size 14", 10, 390)


f.run()